Showing posts with label 28mm. Show all posts

Wednesday, September 28, 2016

The Pork Chop Express


I finished this bad boy up today. Now I just have to paint up my Jack Burton Mini.


Some zombies for scale purposes.


Saturday, September 17, 2016

Aliens!


It took me awhile to get around to buying these as I feel they are kind of pricey. Like $4 a piece pricey. I'm glad I did cause they are really cool. Thinking about picking up the whole AVP: The Hunt Begins game now.
Also, 5 more towards my painting goal bring the total to 93 of 120.

WWII U.S. Soldiers

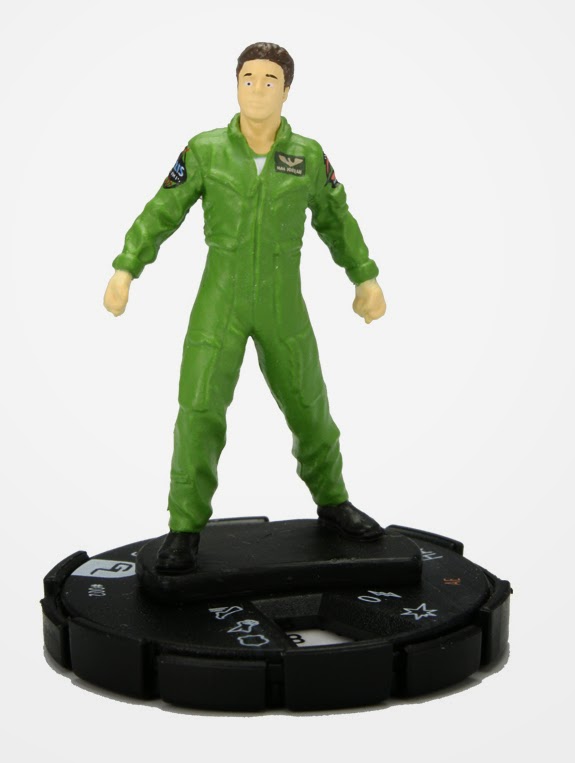
Here are a batch of WWII era soldiers. These are Wargames Factory miniatures, which are maybe not the most period accurate minis around but are just fine for my wargaming needs. Plus, they were a great deal with 30 miniatures in the pack.


Here are some shots of my finished paint job. I printed out the patches on my ink jet printer and stuck them on the arms. They're a bit bigger than they should be but I wanted them to be noticeable and legible.


Also, the colors are a little off on the uniforms but, again, for my needs they work just fine.


15 more miniatures done, which brings my total up to 80.
40 more and I meet my goal (from last year).

I plan to alter the remaining 15 soldiers to be more of a 50's - 60's style. So they'll match up with the Mars Attacks cards.


I might even try to make a flame thrower unit or two. Hmmm....


Saturday, January 31, 2015

Painting Goal for February. Complete!

The goal: 10 miniatures a month.
Here's 11 for February. 

7 zombies and one fresh victim.


Left to Right: Heroclix Vertigo (with a greenstuff robe), Horrorclix zombie, Zpocalypse Hospital Horde, I forget the next one but it's a metal mini, then another little girl from the hospital horde and another Vertigo clix.
In the front row is a downed zombie from the Wargames Factory Zombie Vixens set and a Heroclix conversion (mostly a HC black Mask mini) victim.

Next up? 2 Survivors and a construction worker zombie.


Superboy with added bats (greenstuff again), another Aaron Cash clix and a Horrorclix zombie with a Detroit Tigers hat on that I can't get a good pic of.

Friday, January 30, 2015

Painting Goal for January. Complete!

The goal: 10 miniatures a month.
Here's January
5 zombies. It's hard to tell from this picture but the zombie cop on the left kinda looks like Burt Reynolds. The little girl zombie is still clutching her teddy bear and on the containment suits I added some clear plastic visors to them.

The cops are Heroclix (Aaron Cash with new hands) miniatures and the other 3 are from the Zpocalypse Hospital Horde set.


5 Survivors (yes, I am including the motorcycle).
It's hard to tell in this pic too but the blonde detective has a bloody bandage over her nose. The miniature was damaged and it looked weird as I painted it, so I flattened it out a bit more and gave her a busted nose.


The survivors are all repainted heroclix miniatures

Life and stuff...

With the added expense of daycare my wife and I decided that we could no longer afford our studio space. We gave it up in the fall and I moved everything into a storage space. The goal was to have enough room in there to be able to go in and do a little work now and then.

Sadly, that goal was not attainable. It starts with properly labeled boxes and the intent of having an organized space and it ends with a mad dash of cramming everything into whatever available boxes you have and throwing it into the storage space.

The new, altered, goal was to just be able to find stuff so I could bring it home to work on. That goal has been met. So far.


Speaking of goals, I have decided to try and paint 10 minis a month. Or 120 miniatures by years end. I'd also like to include building a few IHC Homes of Yesterday and Today model kits. Lets say 4 of those (I have 6 or 7 of them).

 I have all 5 of the storefront buildings.
     300-14 Second Hand Rose
     300-15 South Street Smoke Shop
     300-16 Rita's Antique Shop
     300-17 O'Weeds Greenery
     300-18 Grant Cary's Apothecary


And 2 of the Gingerbread houses:
     300-2 The Queen Anne House
     300-3 Steiner House


I will take some pics at another time (and detail my plans for them), until then these ebay pics will do.

All in all it seems like an attainable goal as I have already painted 21 minis. So, January and February are basically covered before February starts. Though I suspect that at the end of the year I'll have about 50-60 painted and maybe 1 IHC kit put together (I have already started on one IHC kit as I type this so that should get finished). I have to add the ERTL farm house to this list.


Tuesday, October 7, 2014

Dinosaurs!

I have been trying to collect a decent set of scale (1/48th, O, 28mm) dinosaurs for awhile now.
I've been pretty lucky so far and have quite a few now. I found these guys the other day at Tuesday Morning for $5.99. I figured $2.00 a figure isn't bad for these guys.


They're pretty close to the correct scale (and hey, who says all dinos are the same?). Here they are with a converted Heroclix mini.


They're aren't perfect by any stretch but they can be with a little help. The good? Close to scale. There is some nice detail in them, the T-Rex even has the bottom of it's feet sculpted (for making footprints), and they are pretty cheap at $2.00 each. The Bad? The seams are really clunky on them, but I figure a little x-acto knife magic and, probably, some green stuff and they'll be in good shape. They definitely need a new paint job, though the T-Rex is pretty OK.


One final bit. The side of the box pretty much sealed the deal for me. These bullet points make absolutely no sense. 


Friday, August 29, 2014

Game Board

Awhile back I realized that I would never get anything done if I didn't figure out a way to focus on my projects. I start on a project, get about 1/4 of the way into it and think of how I could make something else. That would then draw my interest into the new project leaving the old one sitting on my desk. Repeat that thought process about a 100 times and you can paint a picture of what the studio looks like. I have an area of "to paint" miniatures, and an area of "to convert" miniatures, some random 1/48 scale cars to weather, a few 1/48 scale motor homes & ambulances to convert, a pile of white plastic fences that I'm building a gate for (that opens, of course), there's some mesh to make chain link fences, a box of o-scale train tracks, 4" card board tubes and fake brick to make some subway boards, some black grout and plastic strip that will eventually become a paved road set, boxes of 1/48 scale city building models to put together, and on and on and on...

So... my idea to focus came to me as a game board set. I figured I had most of the parts to set up a farm house and surrounding area.
I had made some wood fences .
http://confessionsofaminiaturemodeler.blogspot.com/2013/10/making-fences.html
I had bunch of trees and I had made the fields already.
The silo was painted.
http://confessionsofaminiaturemodeler.blogspot.com/2013/10/thrift-score.html
I had my Machine Shed.
http://confessionsofaminiaturemodeler.blogspot.com/2014/04/ertl-farm-country.html

And I found an Ertl farm house (which I had started working on how to add some interiors to). Most of my grass boards were in pretty good shape and I felt like this was my best shot at getting something done. There is a TON of stuff to do to it still but it's coming together.


Friday, May 23, 2014

The ERTL Machine Shed conversion Part 1

Recently, I posted about the ERTL Farm Country Machine Shed set. (http://confessionsofaminiaturemodeler.blogspot.com/2014/04/ertl-farm-country.html)
I'm really happy with the way it looks with all the 25-28mm/O Scale/1:48th mish mash of stuff I have going on so far. Once I finish I'll take some better pics for scale purposes.
So far, I've glued the roof pieces together and sprayed them with a gun metal-ish silver spray paint.
I had forgotten my camera for this step so there are no step by step shots. (I can't afford to waste any time in the studio by going back home to grab the camera). Here's the roof.
I plan to spray it with a dark(ish) green.


And the inside of the roof.


I scraped off the numbers and mold marks so that the interior would be smooth. Then I cut some strips of plastic and glued them on to give it some character.

Next I cleaned up the wall sections and glued them together.
Inside walls (you can see the circular mold marks)

 Outside walls


Then I took some of these drink stirrers (Not sure where I got these, which is a bummer because I can see lots of uses for them now) and cut them down to make support beams for the walls.


Pic of the stirrer support beams,


Then I used some plastic to cover up the joints.


I'll spray the interior with the gun-metal silver and the outside with white.
Here's a shot of it (mostly) together.


I still have to figure out the outer doors and the large sliding doors but it's coming along nicely so far.

Sunday, May 11, 2014

Boats

I found the same Dollar General boats at Toys R Us. 
The Toys R Us price?
$5.99

AND...

It has a slightly better paint job to it and looks a bit nicer to me.
Even though it's pretty much the same boat.


Wednesday, April 30, 2014

The Coast Guard

My wife and I went to visit my parents for a Baby Shower/Easter family celebration. We had a great time and got some wonderful gifts from my family. We have another shower planned for the Chicago area folks. That'll be fun. Home Run Inn pizza. Yum!

Anyway, on the way home we stopped at a Dollar General and I grabbed this.


I  didn't realize at the time that it was a battery operated boat, even though it says it right on the cover.  You could probably use this thing in water if you wanted to (even though it doesn't say either way anywhere on the package). FYI the battery operated part. It's the motor in the back that spins.

I'm wondering if I can use the battery pack to rig up a spotlight on top. I'm going to try and track down another boat (or 2) and try a few things.

Anyway, I figured it was pretty close in scale and worth a shot for $6.00.
Here are some shots showing some different sides.


 I plan to take it apart and spray paint the parts. I'll make the deck white and the gray parts metal.


I also plan to raise the cabin up about a 1/4" to make room for the miniatures.


And finally a couple shots with a mini to show just how close it is.


I'm also thinking I'll have to grab 2 (I think I have a couple Hals laying around) of each of these:

Hal Jordan

Paramedic
  

 Then add some greenstuff life preservers to them and paint up a survivor crew and a zombie crew.

Friday, April 25, 2014

ERTL Farm Country

I had read online that the ERTL Farm Country play sets were good for O scale trains.
I figured it should be close for wargaming minis (28mm-ish). Well... they aren't perfect exactly, but they sure are close. For $24.00 (plus shipping) I got the Machine Shed playset and I think it's pretty awesome. A little small but these things come in all different sizes anyway.
Next I want to get the Barn set, then the Farm House.


I'll clean them up and try to buildup the insides a bit where they lack some detail, then get them painted up and weathered. They're going to look great on the Farm board I've been working on.