Monday, December 16, 2013

Sidewalks

Finally getting around to a rant (as promised). This one is fitting because I'm currently working out some ideas on how to make sidewalks for the game.

So, on to the rant.

Sidewalks. I am so sick of the mouth breathing ignorants that shamble around mindlessly on the sidewalks. "Hey everybody look at me, I'm on the right side, now the left, now the middle, now I'm going to look left but go right. Ugh. Pick a side and stick with it.
Some of us actually have places to go.
We, as pedestrians, are given our very own space and somehow it's not good enough for a percentage of people. "I think i'll just walk out in the middle of street and hope the cars stop for me."  C'mon.
My new favorite is waiting for the WALK sign by standing IN the road.

Wouldn't the sidewalks be much easier if everyone treated them like tiny little roads?
Here in the U.S. we drive on the right side. So, Howsabout we try walking on the right side too.

Sunday, November 3, 2013

Where are you, you spongy, yellow, delicious bastards?

I grabbed a yellow Hummer the other day while out running errands, and it dawned on me that something was missing. Dale Earnhardt's number 3 of course. Now I just need to grab some good Tallahassee, Columbus, Wichita & Little Rock figures.


Wednesday, October 23, 2013

Thrift Score.

On Monday, I stopped at the local thrift store to find some items for a Halloween costume and stumbled upon this.

Mondays are 50% off days so this grain silo was 99¢.
I took it to the studio yesterday and cleaned it up. Here's a shot to show the scale.

 I was probably not warm enough for spray painting, but I did it anyway.

Next, I have to weather it a bit and add some rust and such. I may even rig up some kind of interior for it. Just in case the players want to explore the inside. ;)

Weathering done. Thinking about altering the door to be closer to mini height.


Monday, October 7, 2013

Making Fences

I'm currently working on scenery that can be used in a modern (or wild west or even post apocalyptic) setting or fantasy setting. Standard stuff like these hand made fences.


Choose your post. I grabbed a rubber banded bundle of 15 of these at a yard sale for $1.00.
The guy tried to tell me they were hand carved. I looked them over and I asked him if the bar code on the bottom was "hand painted". Anyway...


Cut them to the desired size.


I recommend sanding them to give it a flatter edge. It'll help keep them straight when you base them. I, also, recommend grabbing a sander like this. It's nice. I bought this beauty (the Sand-It) online at www.micromark.com. I also grabbed a Duplicate-It. Which I recommend.


Then I soak them in a watered down black paint bath. You don't have to leave them in there for very long. Also, as a side note, you don't want to mix up to much as the mixture starts to stick after awhile.

Set them somewhere to dry for at least a few hours. You don't want the water interfering with the glue. If you're in a hurry, set them under a lamp to speed up the drying process.


I am currently working on a more sophisticated version of this (I have a tray that I've glued a ruler too and plan on getting some double sided tape to lay down). But for now the duct tape dopes the trick just fine. It helps keep things lined up and makes it MUCH easier to glue together. I'm pretty sure I'm not the only one to have an issue with objects sticking to my fingers better than the glue can hold.


Add your glue drops.


Then your fence pieces.


Clean up the excess glue.


And place something heavy and flat on it so it dries straight.


When it's dry you can trim off the extra over hang of the fance and add your bases ( I use clear plastic, post on that coming soon). And add any extras at this point, like grass, bushes, tall grass, etc.


And finally...


Some Random Stuff

Here are a couple of posts that I wasn't sure how to fit in with other things. So, Random Stuff it is.
First, here's my cheap solution to tall grass for miniatures.


Yep. That's a big Barbie head. I got it on a half off day at a nearby thrift store. So, it only cost me, like, 99¢. I tried dying some of the hair green but it didn't really work the way I wanted it to. I'm going to try some green ink and see what happens.


It works better than the kind you can buy in the package at a hobby shop because you can hold it with one hand and cut it with scissors in the other. The head and base keeps everything in position for you.


Look at my train tracks and you'll see the "grass" in use.


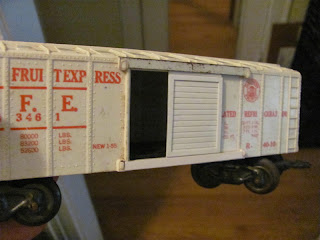
Next is an O scale train car that I picked up cheap because it was missing one of it's doors.

I dug into my box of plastic parts and found something workable, then added an edge to it so it would fit in the groove on the side. Lastly I had to glue a long piece of plastic to the bottom to keep it in place.
I may revisit this and add some extra pieces to give it some more "character". Actually, there's no "may" about it. I will. Cuz it bugs me now...

I did manage to keep enough glue out of the groove so that it still slides open and closes. Sometimes it's the little things that keep you going. :)

Sunday, October 6, 2013

My Hobby Lobby score.

Went to Hobby Lobby looking for a 1/43 semi truck and found a bunch of scenery bits on sale.
I mean, come on, $3.60, you can't go wrong.
I'm really looking forward to putting these on my table.


I called my parents and had them grab some from the stores near them in Michigan. 24 more packs at $3.60 a pack.

Sunday, June 30, 2013

Train Tracks

I've been busy at the studio, I just keep forgetting to bring my camera. So, I finally remembered and after some battery charging time I was able to take some pictures of one of my projects.
Train tracks.
I grabbed some O scale tracks at a model train store (also got a ton from my Dad) and started working on making them a little more realistic.


Start by removing the center rail. Use a small regular screwdriver and pry the little tabs open. Remove the middle support section and keep it with the middle track section so you can combine them and make more tracks.


Next, I glued some wooden coffee stirrers (free) together to get the desired thickness of the rail road ties. I painted them a dark brown and glued them to the tracks. I used E-6000 which worked great (though it does get kinda stringy).
I bought some balsa wood planks Michaels and cut them to match the length of the tracks. Then penciled in some marks to help keep them lined up.

I then hand painted the balsa wood brown. You could probably use spray paint here to save some time. Make sure you get both sides to keep it from warping. The next step is adding the "dirt".

Side note:
I stumbled upon this idea while working on another project. I was cutting some masonite/hardboard, or whatever it's called (it's the stuff used to make clipboards), into circles to use as bases and noticed the remaining sawdust looked a LOT like dirt. So I scooped it up into a jar and saved it.

Anyway, thin out some Elmer's glue with water and coat the top of the board. sprinkle some of the masonite "dust" over it and let it dry.

When dry, glue the tracks to the board with the E-6000.

Then use the Elmer's mix to put down the little stones. I gathered the stones from the beach on Lake Michigan (free). Cover most but not all of the surface. You want room for the dirt to show through. Plus you want space to apply some grass and bushes and such.


I found two things at a thrift store that help make these boards look a little better. The first is a weird fake plant that has a bunch of tiny stalks with leaves on it ($1.00). I don't know what it is or where to find another, but I will be sad when it's all used up. The other was a Barbie hair styling head thingy ($1.00). Cut off little clumps and glue to the boards for grass clusters.


Here's a full shot of a straight section of track.


And another shot of it connected to a curved section.
Now that I'm done with a bunch of them, I kind of wish I had removed the metal pieces near the end. They will help make the sections stronger, but I think they would look nicer if they were all wood ties.